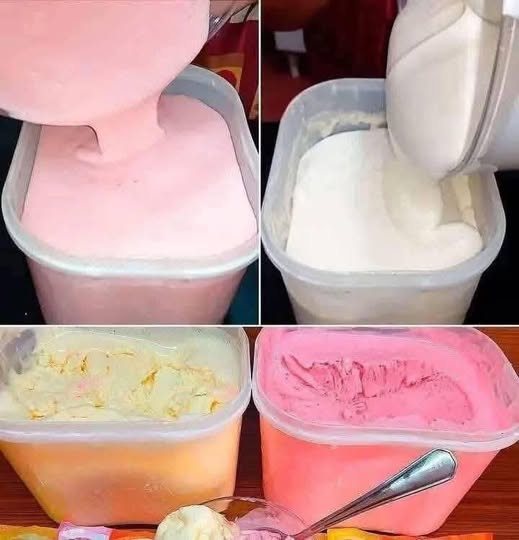
Homemade Layered Ice Cream Delight is a no-churn, freezer-friendly dessert that combines creamy textures, vibrant flavors, and playful colors into a refreshing treat. This recipe is designed for simplicity and satisfaction—no ice cream machine required, just a few basic ingredients and a freezer. The result is a smooth, scoopable ice cream with distinct layers that can be customized to suit any taste or occasion.
The base is a rich blend of whipped cream and sweetened condensed milk, which freezes into a velvety texture without the need for churning. Each layer is flavored and colored separately—think strawberry pink, vanilla white, mango yellow, or chocolate brown—then poured into containers and frozen. The layers can be swirled or stacked, depending on your preference. Once frozen, the ice cream is easy to scoop and serve, making it perfect for family gatherings, summer parties, or late-night indulgence.
This recipe is highly adaptable. You can use fresh fruit purees, flavored syrups, or natural extracts to create your own signature combinations. The layering process adds visual appeal, while the creamy base ensures a luxurious mouthfeel. Whether served in bowls, cones, or cups, this ice cream delivers joy in every spoonful.
 INGREDIENTS
 INGREDIENTS
This recipe yields approximately 1.5 liters of ice cream, enough for 8–10 servings.
Base Ingredients:
- 2 cups heavy whipping cream (chilled)
- 1 can (400g) sweetened condensed milk
- 1 tsp vanilla extract
Layer Flavors (choose 2–3):
- ½ cup strawberry puree or syrup (for pink layer)
- ½ cup mango puree or juice (for yellow layer)
- 2 tbsp cocoa powder + 2 tbsp milk (for chocolate layer)
- ½ tsp almond or rose extract (for aromatic layer)
- ½ cup crushed cookies or biscuit crumbs (optional texture)
Optional Add-ins:
- ¼ cup chopped nuts (pistachios, almonds, cashews)
- ¼ cup mini chocolate chips
- ¼ cup dried fruit or candied peel
- Food coloring (natural or synthetic, for vibrant layers)
INSTRUCTION
 INSTRUCTION
Follow these step-by-step instructions to create creamy, colorful ice cream layers without an ice cream maker.
1. Prepare the Base
- In a large mixing bowl, pour chilled heavy cream.
- Whip using an electric mixer until stiff peaks form (about 3–5 minutes).
- In a separate bowl, mix sweetened condensed milk with vanilla extract.
- Gently fold whipped cream into condensed milk mixture using a spatula.
- Mix until smooth and fully combined—this is your ice cream base.
2. Divide and Flavor
- Divide the base into separate bowls (2–3 portions depending on layers).
- In each bowl, add desired flavor:
- For strawberry: mix in puree or syrup.
- For mango: stir in puree or juice.
- For chocolate: whisk cocoa powder with milk until smooth, then fold in.
- For almond or rose: add extract and optional food coloring.
- Mix each portion gently until evenly colored and flavored.
3. Layer in Containers
- Use rectangular or round freezer-safe containers.
- Pour one flavored mixture into the bottom of each container.
- Smooth the surface with a spatula.
- Add the next layer carefully, spooning gently to avoid mixing.
- Repeat until all layers are added.
- Tap containers lightly to remove air bubbles.
4. Freeze
- Cover containers with lids or plastic wrap.
- Freeze for at least 6 hours, preferably overnight.
- Do not stir or disturb during freezing.
5. Serve
- Remove from freezer and let sit at room temperature for 5 minutes.
- Scoop into bowls or cones.
- Garnish with nuts, syrup, or fruit if desired.
SERVINGS
 SERVINGS
This recipe yields 1.5 liters of ice cream, enough for 8–10 scoops. For smaller portions, use mini cups or ramekins. Ice cream can be stored in the freezer for up to 2 weeks. Always cover tightly to prevent ice crystals and preserve flavor.
NOTE
 NOTE
NOTEHere are some helpful tips, variations, and serving suggestions to make your Homemade Layered Ice Cream Delight even more delightful:
Texture Tips:
- For extra creaminess, use full-fat cream and avoid over-whipping.
- For crunch, add cookie crumbs or nuts between layers.
- For a ripple effect, swirl layers gently with a skewer before freezing.
Flavor Variations:
- Use blueberry, raspberry, or peach puree for fruity layers.
- Add espresso powder for a coffee twist.
- Mix in caramel or peanut butter for richness.
Make-Ahead Tips:
- Prepare base and flavor portions in advance.
- Freeze in individual cups for grab-and-go servings.
- Label containers with flavor combinations and date.
Presentation Ideas:
- Serve in glass cups to showcase layers.
- Top with whipped cream and sprinkles for party flair.
- Pair with wafers, fruit slices, or chocolate sauce.
Dietary Adaptations:
- For dairy-free, use coconut cream and condensed coconut milk.
- For sugar-free, use unsweetened condensed milk and natural sweeteners.
- For nut-free, omit nuts and use fruit or cookie add-ins.
Troubleshooting:
- If ice cream is icy, ensure cream is whipped properly and base is mixed gently.
- If layers blend, chill each layer briefly before adding the next.
- If flavor is weak, increase puree or extract slightly.
FINAL THOUGHTS
 FINAL THOUGHTS
Homemade Layered Ice Cream Delight is more than just a dessert—it’s a celebration of creativity, comfort, and indulgence. With its creamy texture, vibrant layers, and customizable flavors, it offers joy in every bite. Whether served at a festive table or enjoyed quietly on a warm afternoon, it brings refreshment and satisfaction.
The process of making this ice cream is as rewarding as the result. From whipping cream to layering and freezing, each step invites care and imagination. The final dish, colorful and smooth, is a testament to the beauty of homemade treats.

