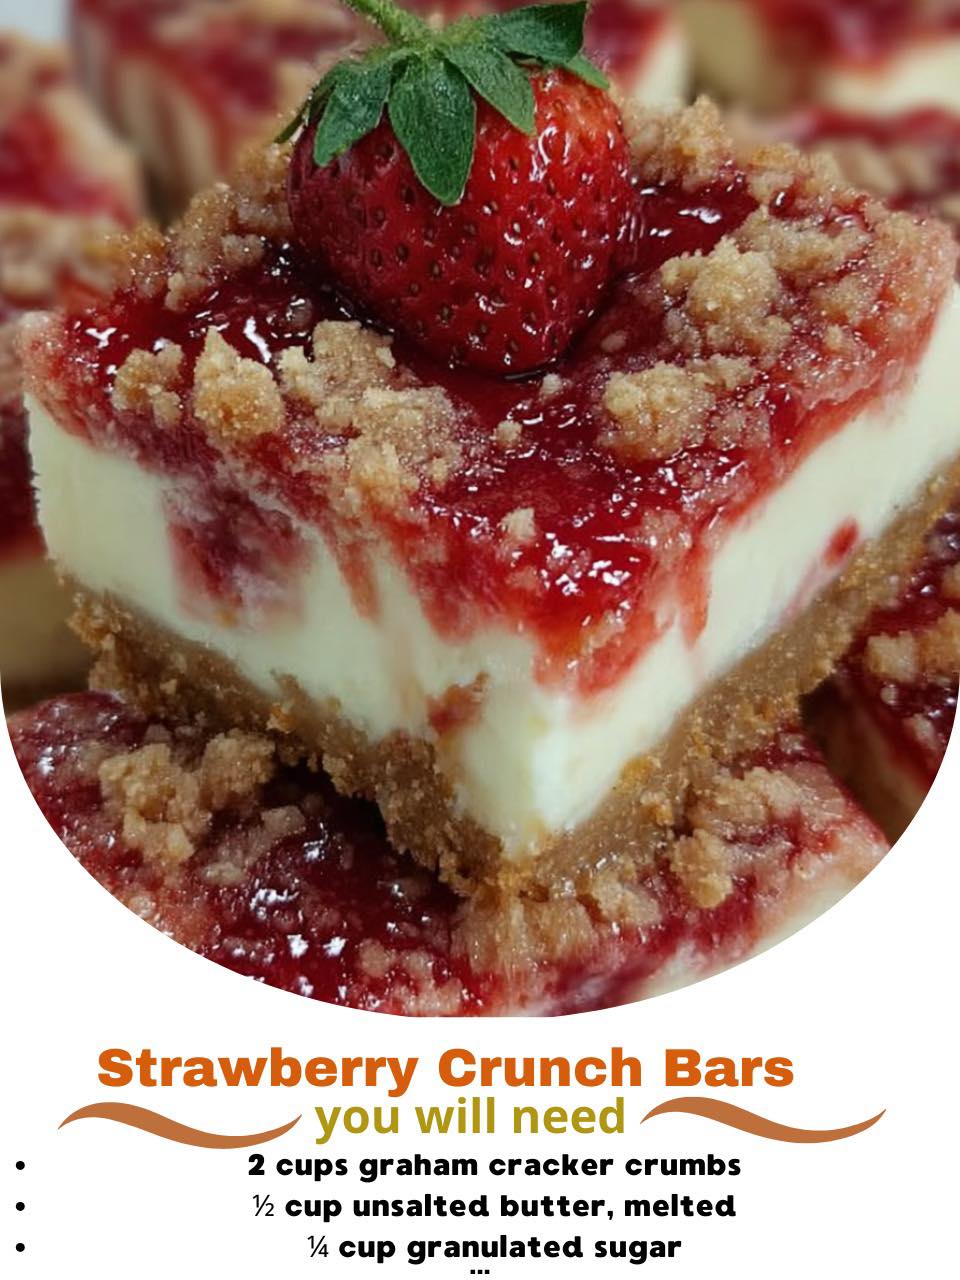
Strawberry Crunch Bars are the kind of dessert that instantly brings comfort and nostalgia to the table. With their buttery golden crust, creamy strawberry-infused filling, sweet strawberry topping, and signature crunchy crumble layer, these bars are a delightful combination of creamy, fruity, and crispy textures. Whether you want a portable treat for picnics, a dazzling dessert for guests, or simply a sweet bite to enjoy with a cup of tea, Strawberry Crunch Bars deliver every time.
This long-form article will guide you step-by-step through creating this indulgent dessert at home. You’ll learn how to choose ingredients, build the layers properly, customize the flavor, store the bars correctly, and even calculate approximate calories. If you love recipes that are easy but feel gourmet, you’re in the right place. Let’s get baking!
Preparation Time
Prep Time: 25 minutes
Cooking/Baking Time: 25–30 minutes
Cooling + Chilling Time: 2–3 hours
Total Time: About 3 hours 30 minutes
Ingredients
Here is the complete list of ingredients separated by layer for clarity.
FOR THE CRUST
2 cups graham cracker crumbs
½ cup unsalted butter, melted
¼ cup granulated sugar
1 teaspoon vanilla extract
FOR THE STRAWBERRY CREAM FILLING
8 oz cream cheese, softened
1 cup heavy whipping cream
¾ cup powdered sugar
1 teaspoon vanilla extract
½ cup strawberry jam or strawberry preserves
1 tablespoon lemon juice
Optional: pink or red food coloring (a few drops)
FOR THE STRAWBERRY TOPPING
1 ½ cups diced fresh strawberries
¼ cup granulated sugar
1 tablespoon lemon juice
2 teaspoons cornstarch
2 tablespoons water
FOR THE CRUNCH TOPPING
1 cup freeze-dried strawberries
1 cup Golden Oreos (about 10–12 cookies)
4 tablespoons unsalted butter, melted
This crunchy topping is what gives Strawberry Crunch Bars their famous “ice cream bar” vibe.
Instructions — Step-by-Step
Below is a detailed guide on how to prepare each layer properly for the best texture and flavor.
Step 1 — Prepare the Crust
Preheat your oven to 350°F (175°C).
In a mixing bowl, combine:
graham cracker crumbs
melted butter
granulated sugar
vanilla extract
Mix until the crumbs are fully coated and the texture resembles wet sand.
Line an 8×8-inch baking pan with parchment paper for easy removal.
Press the crumb mixture into the bottom of the pan using the back of a spoon or a flat measuring cup.
Bake the crust for 8–10 minutes or until lightly golden.
Allow the crust to cool completely before adding the filling.
Step 2 — Prepare the Strawberry Cream Filling
In a large bowl, beat the softened cream cheese until smooth.
Add powdered sugar and vanilla extract; continue mixing until creamy and lump-free.
In a separate bowl, whip the heavy cream until stiff peaks form.
Fold the whipped cream gently into the cream cheese mixture.
Add strawberry jam and lemon juice; mix until well combined.
Optional: add a few drops of food coloring for a brighter pink color.
Spread this filling evenly over the cooled crust.
Place the pan in the refrigerator while preparing the topping.
Step 3 — Prepare the Strawberry Topping
In a small saucepan, combine:
diced strawberries
sugar
lemon juice
Cook over medium heat until the strawberries release their juices — about 4 minutes.
In a separate small bowl, mix cornstarch and water to form a slurry.
Add the slurry to the strawberry mixture, stirring constantly.
Continue cooking for 2–3 minutes until thickened.
Remove from heat and let cool completely.
Once cooled, spread the topping over the strawberry cream layer.
Step 4 — Prepare the Crunch Topping
Place freeze-dried strawberries in a zip-top bag and crush into small pieces.
Crush Golden Oreos either by hand or in a food processor.
Add the melted butter to the mixture and stir until combined.
Sprinkle the mixture evenly over the strawberry topping layer.
Step 5 — Chill and Serve
Refrigerate the dessert for at least 2–3 hours, or preferably overnight.
Once chilled and set, lift the bars out using the parchment paper.
Cut into squares using a sharp knife.
Serve chilled for the best flavor and texture.
How to Prepare the Recipe (Detailed Methodology)
This section expands on the why and how behind each step for those who enjoy understanding the science of baking.
1. Why the crust matters
The crust acts as the foundation of the bars. A crust that is too crumbly will fall apart when sliced. Using enough melted butter ensures the crumbs bind together properly. Baking the crust helps solidify it, preventing a soggy base once the cream and fruit layers are added.
2. Balancing the creamy filling
The cream layer combines the richness of cream cheese with the lightness of whipped cream. This gives the bars a mousse-like texture rather than a dense cheesecake feel. The strawberry jam adds fruity sweetness without making the mixture watery.
3. Perfect strawberry topping
The cooked topping intensifies the flavor by reducing the strawberries, sugar, and lemon into a thicker compote. Cornstarch ensures it sets into a soft gel that won’t run off when sliced.
4. The signature crunch
Freeze-dried strawberries provide intense natural flavor without adding moisture, while Golden Oreos provide sweetness and crunch. Butter binds the crumble so it sticks to the top without falling apart.
5. Chill time is essential
Since the filling has whipped cream and cream cheese, it requires several hours to firm up. Skipping this step will result in messy, soft bars that don’t slice cleanly.
Tips for the Best Strawberry Crunch Bars
To ensure these bars are perfect every time, here are several expert-level tips:
1. Use freeze-dried strawberries, not dried fruit
Freeze-dried berries are crisp, flavorful, and not chewy. They maintain color and texture in crumble toppings.
2. For a firmer filling, add extra cream cheese
If you prefer the bars more cheesecake-like, increase the cream cheese from 8 oz to 12 oz.
3. Don’t skip the lemon juice
It brightens the flavor and balances sweetness beautifully.
4. Chill overnight for best results
The longer the bars chill, the easier they slice and the better they taste.
5. Use a hot knife for clean slices
Dip the knife in hot water, wipe dry, and slice again. This prevents sticking.
6. These freeze well
You can freeze them for up to 2 months. Thaw in the refrigerator.
7. Want an even crunchier topping?
Bake the crumble for 5 minutes at 350°F before adding. This intensifies caramelization.
8. Use fresh strawberries when possible
Fresh strawberries create the brightest topping flavor, but frozen ones work in a pinch (just thaw and drain well).
Serving Suggestions
Strawberry Crunch Bars are incredibly versatile. Here are ways to serve them:
As a dessert bar
Perfect for family gatherings, birthday parties, or spring holidays like Easter.
With vanilla ice cream
The warm vanilla complements the fruity tartness.
With whipped cream
A small dollop on top adds elegance.
As part of a dessert board
Pair with chocolate-dipped strawberries, brownies, and mini cheesecakes.
As a frozen treat
Freeze the bars and enjoy them semi-frozen for a refreshing summer dessert.
How to Store Strawberry Crunch Bars
In the refrigerator:
Store in an airtight container for up to 4 days.
In the freezer:
Wrap individual bars tightly and freeze up to 2 months.
Avoid leaving them at room temperature:
Because the filling contains dairy and whipped cream, these bars soften quickly.
Variations & Customizations
Strawberry Crunch Bars can be adapted endlessly. Here are popular twists:
1. Lemon Strawberry Crunch Bars
Add:
2 tablespoons lemon zest to the filling
2 tablespoons lemon juice to the crust mixture
The result is tangy, fresh, and bright.
2. Chocolate Strawberry Crunch Bars
Add:
½ cup melted white chocolate to the filling
Drizzle melted milk chocolate over the top after chilling
This version tastes like a gourmet chocolate-covered strawberry.
3. No-Bake Version
Skip baking the crust and add 2 extra tablespoons melted butter.
Refrigerate immediately.
This is perfect for extra hot days or when you want a quick treat.
4. Coconut Strawberry Crunch Bars
Add:
½ cup shredded coconut to the crust
Sprinkle toasted coconut on top
Perfect for tropical lovers.
5. Mixed Berry Crunch Bars
Replace strawberries with blueberries, raspberries, or a mixed berry blend.
6. Strawberry Cheesecake Bars
Increase cream cheese to 16 oz, remove whipped cream, and bake the filling for 20 minutes for a cheesecake-style bar.
Common Mistakes to Avoid
Here are typical problems and how to fix them:
The bars don’t set
Chill longer — at least 3 hours, ideally overnight.
Add more cream cheese for firmness.
Crust crumbles apart
Not enough butter — add an extra tablespoon.
Press firmly using the bottom of a cup.
Crunch topping gets soft
Add just enough butter to bind — too much causes sogginess.
Keep chilled until serving.
Calories (Approximate Per Serving)
Based on slicing the 8×8 pan into 12 bars, each bar contains approximately:
Calories: 295
Fat: 17g
Carbohydrates: 31g
Sugar: 21g
Protein: 3g
Calories may vary depending on brands and portion size.
Conclusion
Strawberry Crunch Bars are a dessert that looks impressive, tastes luxurious, and yet is surprisingly simple to prepare. With layers of buttery crust, smooth strawberry cream, juicy strawberry topping, and the irresistible strawberry-Oreo crunch, each bite is packed with flavor and texture. These bars can be made ahead, customized for any occasion, and stored easily for future treats.
Whether you serve them for a special gathering or enjoy them quietly at home, they’re guaranteed to become a favorite. Their nostalgic strawberry shortcake crunch paired with a creamy filling brings joy with every slice.
If you love desserts that combine creaminess, fruitiness, and crunch, this recipe will not disappoint. Happy baking!

