Cloves are one of the most beloved spices in the world, valued for their warm aroma, distinctive flavor, and medicinal properties. While they’re often thought of as exotic imports from tropical lands, growing cloves at home is entirely possible — with a bit of patience and the right care. Whether you want to enjoy their fragrance or harvest your own spice, here’s a simple guide to cultivating cloves in your own space.
1. Understanding the Clove Plant
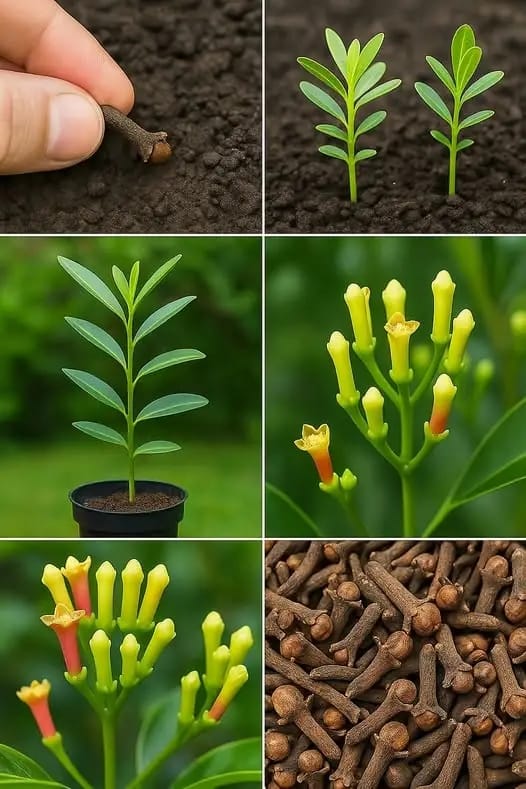
The clove tree (Syzygium aromaticum) is a slow-growing evergreen native to Indonesia’s Maluku Islands, also known as the “Spice Islands.” It can reach up to 8–12 meters in height in its natural habitat, but when grown at home in containers, it remains much smaller — typically under 2 meters.
Cloves are actually the dried flower buds of this tree. They start as small, green buds that turn pink as they mature. When harvested and dried, they become the brown, nail-shaped spice we know and love.
2. What You’ll Need to Get Started
To grow cloves successfully at home, you’ll need:
Fresh clove seeds: Purchase viable seeds from a reliable supplier. Avoid dried cloves from the spice rack — they won’t germinate.
A large pot or container: At least 18 inches deep with good drainage.
Rich, loamy soil: A mix of garden soil, compost, and sand for aeration.
A warm, humid environment: Clove trees thrive in tropical conditions. Aim for temperatures between 25–35°C (77–95°F).
Indirect sunlight: Cloves love bright but filtered light.
3. Germinating Clove Seeds
Clove seeds are delicate and lose viability quickly, so plant them soon after purchase.
Soak the seeds in lukewarm water for 24 hours to soften their outer layer.
Prepare a seed tray with moist, well-draining soil.
Plant the seeds about half an inch deep and cover lightly with soil.
Keep the soil moist but not waterlogged — misting works well.
Cover the tray with plastic wrap or a humidity dome to retain warmth and moisture.
Within 2–3 weeks, tiny sprouts should begin to appear. Once the seedlings reach about 6 inches tall, they’re ready to be transplanted.
4. Transplanting and Care
Transfer your seedlings to larger pots filled with rich, organic soil. Place them in a warm, partially shaded spot.
Watering: Keep the soil consistently moist, especially in warm weather. However, avoid waterlogging — the roots are sensitive to standing water.
